
Hardware Implants as an Initial Access Vector
This is the first post in a multi-part series on creating a hardware implant for initial access. Stay tuned for updates!
On every red team engagement, one of the first steps is to gain access to the target environment. Generally, red teams will leverage social engineering techniques to get their customer to run a payload sent through email or other digital means. Unfortunately for us, on this particular engagement the client was doing a great job of screening and deconflicting suspicious emails – a no-go for access for our team. Because of this, we took a different approach.
The Problem
We could not coerce our client to click on our phishing emails, and we needed access to continue the engagement. Additionally, the public-facing assets of our client were extremely limited, making the job of initial access even more difficult.
The Solution
Because our engagement included agressing the physical premises of our client, we turned towards their wireless networks – if we could crack their PSK, we could potentially add a rouge device that would reach back to our C2 infrastructure and act as a jump-box for further enumeration and exploitation.
The Process
While saying “let’s add a rogue device to their network” is easy, the process itself is definitely more involved. For this approach to work, we needed a few key things:
- The client’s wireless network must utilize WPA/WPA2 Personal encryption
- We need to get close enough (without arousing suspicion or being spotted) to perform a deauthentication attack, and capture the 4-way handshake for offline analysis
If these criteria were not met, we would have to go back to the drawing board. Thankfully for us, our client was using WPA2 Personal encryption, and we were able to successfully deauth and capture a valid 4-way handshake. We were not out of the woods yet however. Our next steps were the following:
- The client’s WPA/WPA2 PSK needed to be weak enough to crack in a reasonable time frame.
- We needed to hack together a device that would not look out-of-place and had connectivity to both the client’s network and our C2 infrastructure.
- The connectivity to our infrastructure needed to be secure to protect the client’s information
Our client’s PSK was easy enough to crack, taking about a day – we had a way in, now just to construct the implant itself.
WPA/WPA2 PSK is generally not recommended for an enterprise deployment. It is recommended to deploy more robust authentication methods for wireless clients such as WPA2-Enterprise with EAP-TLS based authentication. Even so, this may be out of reach for some companies. In this case, consider increasing the length and complexity of the PSK to prevent offline cracking attempts1.
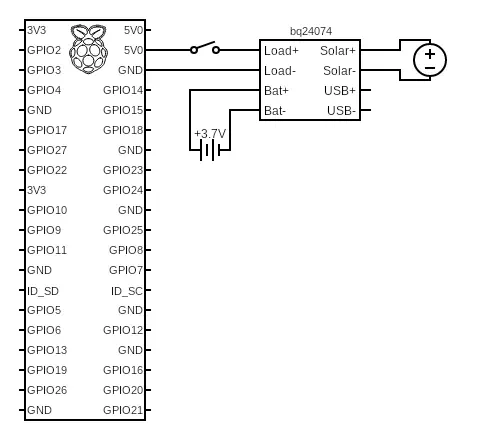
The Hardware
We needed a low-powered device that we could stash in an inconspicuous project box that would be powered for the duration of our engagement hours. For this, we turned to the ubiquitous Raspberry Pi Zero W with some additional components to ensure it would remain powered on during the engagement.
The bill of materials is:
- Raspberry Pi Zero W with Headers
- Small 6V 1W Solar Panel
- 3.8 / 1.3mm or 3.5 / 1.1mm to 5.5 / 2.1mm DC Jack Adapter Cable
- Adafruit Universal USB / DC / Solar Lithium Ion/Polymer charger - bq24074
- Lithium Ion Battery - 3.7V 2000mAh
- Rat and Mouse Killer Child and Dog Resistant Refillable Station, 1 Station with 15 Baits
- 8 Amp Single-Pole Toggle Switch (1-Pack)
The wiring diagram for the setup is very basic and shown below.
With everything wired up and working outside of the enclosure, we now needed to fit everything into the bait station. With the assistance of a rotary cutter and a drill, we were able to clear some of the internal structure and get everything fitted properly. Additionally, some scrap plastic was hot glued in place to make our rat trap more rodent-proof (hah).
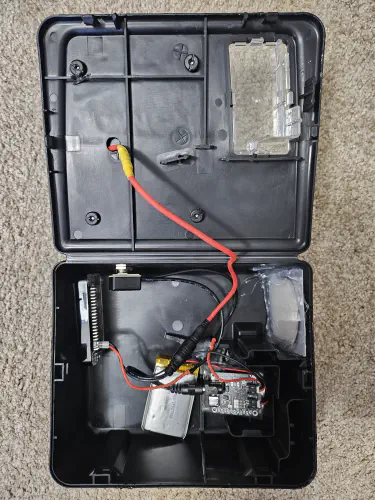

Plenty of room in here for activities. We initially fit a full Raspberry Pi 4 and an external Alfa NIC, however the bq24074 can only output 1.5A maximum which is woefully under the minimum power requirement of the Pi 4. We opted for the Raspberry Pi Zero W which freed up plenty of internal space for future use.
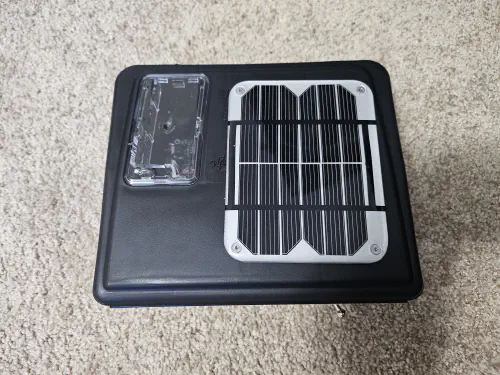
With everything closed up it looks pretty good! Stashed against an external wall of our client it shouldn’t look out of place. We’ll cover the software side of this project in the next post in this series.
Other posts in the hardware implant series: